Monday, January 31, 2011

Tantilizing Tilapia in White Wine and Veggies

I'll admit it.  I was going to take a break from blogging tonight.  I was going to make a simple, boring, "I'm just recovering from a bad case of the Mondays" dinner.  I contemplated making a simple pizza...after all, there was dough, leftover tomato sauce, and a fresh mozzarella ball sitting on the top shelf of the fridge.

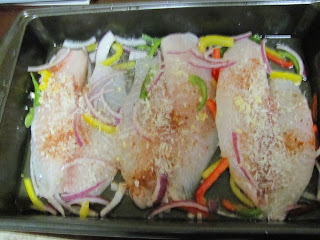
Suddenly my eyes caught a package of tilapia fillets, purchased during my regular weekend grocery store stock-up.  I just couldn't justify letting the fish sit there another night.  In my opinion, after a day or two of sitting in the fridge, fish tend to get a little....fishy (I know, bad pun).  As soon as I prepped the fish for the oven, I knew this was a recipe that deserved to be shared.  It looked so vibrant and colorful, just the thing to cure a case of seasonal affective disorder!


Seriously, it looks like spring time...in a pan!
This recipe is simple to make, healthy, and most importantly, delicious!


Ingredients:
1 1/2 lb Tilapia Fillets (about 3 large fillets)
1/4 cup red onion, thinly sliced
1/2 cup mixed bell pepper, thinly sliced into strips (any mixture of red, yellow, green or orange)
2 tbs olive oil
1/4 cup white wine
1/4 cup bread crumbs
1 lemon, juiced
1 garlic clove, minced
Chili power, salt and pepper, to taste

Instructions:

1. Preheat oven to 325
2. Add olive oil to an empty baking pan
3. Line the pan with the assortment of veggies (peppers and onions)
4. Place tilapia filets in the pan
5. Pour wine over fish and veggies and lemon juice
6. Add salt, pepper, garlic, and chili power as desired (I like to use chipotle chili powder for a little kick)
7. Sprinkle bread crumbs over the top of the fillets
8. Bake for about 25 minutes, or until fillets easily flake with a fork
9. Serve hot with veggies and sauce spooned over fish


As you can see, I served my tilapia with steamed green beans and cous-cous

Give this one a try and let me know what you think!

Cheers,

Emily

Sunday, January 30, 2011

Stuffed Mushrooms!

Appetizers are amazing!  Dress them up, you have cocktail party fare.  Dress them down, you have Superbowl food (truth be told, appetizers may quite possibly qualify as the only thing I enjoy about football).  Make a variety of different appetizers, you can call it a Tapas dinner.

An appetizer's only purpose in life is to be scrumptious.  After all, appetizers are always eaten in small portions, so people are less likely to worry about Weight Watchers points, and more likely to dig in to that fabulous bacon-wrapped date everyone's been talking about.  A great appetizer wakes up your palette and leaves you wanting more.
Another bonus: appetizers smell really yummy.

This past Saturday evening, 4pm struck, and so did a voracious hunger.  But alas, it was too early to make dinner, and too late to think about a late lunch.  After all, I had a delightful dinner planned and the last thing I wanted to do was ruin my appetite.  I opened the fridge and a few key ingredients met my eyes: mushrooms, goat cheese, turkey bacon...EUREKA!  I decided to make stuffed mushrooms!

The great thing about stuffed mushrooms is that you can basically stuff anything into those suckers.  They also end up looking impressive and tasting even better.  Here are the ingredients I used (and some great substitutions you can use too)!:

8-10 Mushrooms (I used "baby bellas," but any large sized, button shaped 'shroom will do)
3 oz goat cheese, crumbled (most cheeses could work here)
1 mozzarella string cheese, grated (told you I literally used up what was in my fridge)
2 strips turkey bacon, chopped (real bacon, ham, or prosciutto would all be scrumptious)   
1/4 cup bread crumbs (Italian or Panko is fine)
Uncapped mushroom with plenty of stuffing room!
2 tbs butter or margarine
2 tbs chopped green onions
1 clove minced garlic
1/4 cup chopped red onion

Instructions:

1. Preheat oven to 425
2. Remove mushroom caps.  Set uncapped mushrooms
aside on a baking sheet and chop stems.
These guys are practically begging for filling!
3. Saute bacon on medium heat until crispy.

4. Add red onions, garlic, mushroom stems, and butter (note: if you use real bacon, you won't need the butter).  Saute on medium-low until tender.
5. Add cheeses, green onions, and bread crumbs and cook on low heat for about 2 minutes or until filling is crispy and cheese has begun to melt.
6. Stuff filling into mushrooms - try to get as much filling in as will fit.  The more, the better!
7. Bake mushrooms for about 10 minutes or until heated through.
8.  Serve and enjoy!

You will look this happy if you try this recipe!
As you may have guessed, I'm a fan of apps (and no, I don't mean for my i-phone).  So I can promise you more appetizer recipes in the near future.  I may even inspire you to host a Superbowl party!

Cheers,
Emily

Thursday, January 27, 2011

CHOPPED!

Being the cooking nerd that I am, I asked for something rather non-traditional for Christmas.  I asked my husband to stage a culinary challenge for me.  I got the idea from the Food Network television show, Chopped.  The premise of the show is that four chefs compete in three rounds of cooking (appetizer, entree, and dessert).  The chefs are given a basket of ingredients for each round that they must use in the dish.  Each round, one chef gets "chopped" (hence the title of the show).  By the end, there is one chef standing, and he or she becomes a Chopped Champion.

This past Tuesday evening, I arrived home from work to a basket of secret ingredients, a well-stocked pantry, and a grinning husband.  It was on.  I was given 30 minutes on the clock to create a delicious entree. 

My secret ingredients (which Rich took from an actual Chopped episode):
1. Chicken things (bone-in with skin)
2. Ginger root
3. Green Onions
4. Honey

My initial reaction was one of relief - this was a flavor profile I could work with!  Immediately, I thought Asian!  Using every one of these ingredients would not be difficult. 

Then, I took a look at the chicken and panicked.  These were some monster thighs and 30 minutes was not a lot of time.  I had to ensure they were cooked through, or else I would be chopped for sure (no one ever makes it to the next round serving raw poultry).  So, here is what I did:

1. I immediately preheated the oven to 375, as I knew I wanted to bake the chicken.  However, I decided to brown the chicken in a pan to get the cooking process started while the oven pre-heated.
2. Once browned, the chicken found its way to a baking pan and into the oven.
3. Meanwhile, using the same pan (now coated with a bit of chicken fat), I sauteed grated ginger and garlic. 
4. After the ginger and garlic softened, I added a bit of white white, orange juice, honey, chili powder, green onions, and just the tiniest bit of peanut butter.  As we all know too well, peanut butter can have a very overpowering effect: use sparingly!  I let this mixture reduce on a low heat.
5. Then I thought, well, I can't just serve chicken and sauce.
6.  Keeping with the Asian-inspired theme, I sauteed a bit more garlic and ginger in olive oil in a separate pan.  Then I tossed in some baby spinach and thinly sliced fennel.  I added salt and pepper to taste. 

7. Well, here I was with about 5 minutes on the clock and things were looking good.  The chicken was just about done, but the skin was not crispy. 
8.  I brushed a bit of the wine reduction sauce over the chicken skin and threw the pan of chicken into the broiler.  After a minute or two of broiling, I removed the chicken from the oven to rest.
9. 3 minutes to go...
10. I got to thinking about my dish and realized this could end up pretty one-note texturally.  I've seen many an episode where the food was delicious, but the contestant was chopped because the dish could have used a crunch.  Thinking quickly, I spotted some pistachios in the cupboard, crushed them, and topped off the veggies with some pulverized pistachio!
11. One minute left and time to plate!  The veggies were transferred to the plate as was the chicken.  I even smeared the sauce all fancy-like around the plate.  Oh yeah, you know what I'm talking about.
Time is up!  Step away from your dishes!

Although I was not actually competing with anyone (just going for personal best), Rich assured me that this dish would NOT be chopped!

Try this dish yourself, or better yet, stage your own version of Chopped!  It was a lot of fun.  Next time, I'm going to try to do an appetizer round followed by an entree round (that is, if someone is kind enough to go out and purchase some more secret ingredients for me)! 

Happy cooking,
Emily

Sunday, January 23, 2011

Homemade Spaghetti Sauce and Turkey Meatballs (in an hour or less)!

It's a Wednesday night at 6:30pm.  You just got back from the gym and you are famished.  You're thinking, "I could really go for some spaghetti and meatballs, but that will take all night!"  Think again!
 
Pasta sauce is one of my favorite things to cook!  There are so many variations and (believe it or not), a good sauce doesn't have to take all day.  I have always been a meatball fan.  Substituting ground turkey for beef cuts out some of the fat and cholesterol.  I know what you're thinking: "Won't my meatballs end up dry if I use a lean meat like ground turkey?"  The answer is a resounding NO!  In fact, I can guarantee that if you follow my recipe, your turkey meatballs will be moist, tender, and delicious.  Another bonus: leftover meatballs make for some fantastic meatball subs (just ask my husband, he's a fan). 


First things first, you'll want to get the sauce going early so it has some time to thicken and develop a rich flavor. 

Pasta Sauce Ingredients:

2 - 28oz cans crushed tomatoes (you can also use whole and puree them)
2 garlic cloves, minced
1 small yellow onion, grated
2 carrots, grated
1/2 green bell pepper, minced
2 tbs olive oil
2 tbs butter or margarine
1/4 cup inexpensive red wine
2 tbs dried basil*
1 tbs dried marjoram*
1 tbs dried italian parsley*
Salt and pepper to taste

*Fresh herbs are absolutely fabulous (I simply cannot wait until it is warm enough to grow herbs again).  If you are lucky enough to have them handy, give them a fine chop and be sure to add them to your sauce just before serving.  You can reduce the dried herbs you added earlier by about half.


1. Heat butter and olive oil in a large sauce pan at medium heat.
2. Add onions, garlic, carrots, and green pepper.  Saute at medium until tender.
3. Add crushed tomatoes, wine, herbs, salt, and pepper.  Give the sauce a stir.  Reduce heat to medium-low and cover. 

While sauce is simmering and thickening, it is time to get started on your meatballs. 

Meatball ingredients:
1.25 lb ground turkey (7% fat or less is preferable)
1/2 cup Italian breadcrumbs
1/4 cup grated parmesan cheese
1 egg
Splash of milk
1 tsp olive oil
1 tsp dried basil
1 tsp dried parsley


1. Preheat oven to 350.
2. Add all ingredients together in a large mixing bowl.
3. Get in there with your hands and work the meatball mixture until all ingredients are thoroughly combined.
4. Meat should now be easy to mold into balls (add more breadcrumbs if mixture is too wet).
5. Mold meat into small-medium sized balls (a bit larger than a golf ball). 
6. Line meatballs on a large baking sheet.  This recipe should make about 12-16 balls.
7. Bake meatballs for 10 minutes (or until browned on all sides)

THEN...

Mmm.  Smells like an Italian lives here!

Add meatballs to your sauce!   Traditionally, meatballs are not baked at all, but simmered in tomato sauce for a long period of time for a slow cook that retains moisture.  I find that when I don't have the time for this, simply browning the meatballs in the oven and then adding them to the sauce works great!

Allow sauce and meatballs to simmer for an additional 30 minutes.  Take this time to boil some water and cook your spaghetti.  Fresh grated mozzarella and/or parmesan cheeses make lovely garnishes to a fabulous bowl of spaghetti and meatballs!


Happy Cooking,
Emily

Saturday, January 15, 2011

Crispy Pan Seared Porkchops and Tender Golden Potatoes

To quote the film Babe, "pork is a nice sweet meat."  I have to admit, I was never a huge pork chop fan.  Generally, I find it difficult to find a lean, thick cut, boneless pork chop in the supermarket.  They can be fatty and lack tenderness.  That is, until I began buying them locally.  These days, "buy fresh, buy local" is all the rage, especially here in Charlottesville.  That's why I felt like a real Charlottesvillian when I made my first grocery purchase from Relay Foods.  The idea is to buy your groceries from local farms and businesses and pick them all up at a conveniently "local" location.  I was intrigued with the idea of farm fresh pork chops (although these were a bit pricier that most you find in the average market), so I decided to indulge.  And boy, was that the right decision, for these were the most succulent pieces of pork you can imagine.  So I urge you, if you can find a farm fresh piece of pork, spend the extra couple dollars.   You won't be sorry.  And now, without further ado, here is how to create the deliciousness that these little piggies were fated to become.

Ingredients - Crispy Pork Chop:
 
4 boneless pork chops (about 2-3 inches in thickness)
1 egg
2 tbs milk
1 cup panko bread crumbs (I know, I am panko obsessed)
1 tsp paprika
2 tbs Olive Oil
Salt (kosher salt is preferable)
Pepper

1. Pound out the pork chops to about half their thickness.  This will really help tenderize them.
2. Set out two wide bowls (pie pans also work great for this). Whisk the egg with the milk in a wide bowl.
3. In another bowl, combine bread crumbs, paprika, salt, and pepper.
4. One by one, coat chops in egg wash, followed by bread crumb mixture.  Be sure all sides of chops are coated evenly.
5. Heat olive oil in pan on medium-high. 
6. When oil is hot, add pork chops (2 at a time works well). 
7. Generally, chops will take 3-5 minutes to cook on each side, depending on thickness.
8. Chops are cooked when each side is a golden brown color and there is no pinkness in the middle.  It is very easy to overcook chops, which makes for some rubbery, tough piggies (I know, I've done it).
9. Repeat until all chops are cooked.  Set on paper towels to drain oil for a minute or so before serving.

BEFORE the sizzle...
Done!


Tender Roasted Potatoes


My tender roasted potatoes are very easy and delicious.  You can substitute in any herbs or spices that you like.  If you like your potatoes crispy, you can cook at a higher temperature and leave out the chicken stock.  However, I find the tenderness of these potatoes really complements the crispy element of the pork.  

Ingredients - Tender roasted potatoes

4-6 medium sized yukon gold potatoes, sliced into thin rounds (Tyler Florence refers to these as "the Cadillac of potatoes)
2 garlic cloves, minced
1 medium sweet vidalia onion, chopped
2 tbs olive oil
1 tsp paprika
1 tsp chipotle chili powder
1/2 cup chicken stock
salt and pepper, to taste

1. Preheat oven to 350.
2. Throw potato slices and onions into large pan.
3. Toss in olive oil, paprika, chili powder, garlic, salt and pepper.  Use your hands to toss everything around in the pan to make sure spices evenly coat potatoes and onions.  Everything should end up in a fairly even layer.
This is how they'll appear in the pan before baking

4. Pour chicken stock over potato mixture.
5. Cook for about 30 minutes or until potatoes are tender.

Serve pork chops and potatoes with some sort of healthy veggie.  I went with an old stand-by, steamed broccoli.  
Ta-Da!

Try this recipe for yourself or send it to a pig-loving friend! 

Snort snort,
Emily

P.S. As a child, I was an avid pig-lover.  I had multiple piggie banks, a stuffed pig named Arnold, and I yearned to grow up and own my own pig farm (the pigs would be strictly pets, not dinner).  My, my, how I have changed my ways.  To quote myself at 7 years of age, during a breakfast in which bacon was involved, "Pigs of the world, forgive me!  My mommy is making me eat this!"
Wednesday, January 12, 2011

Garlicky Mushroom Stuffed Chicken in White Wine


After a long day of work, my first order of business is to open up the fridge, raise an eyebrow, and get inspired.  I throw on an apron and never look back.  This is what happened tonight...

Here's what you'll need:

Chicken breast tenders -  about 2 lb
Grated Parmesan cheese - 3 tbs
Fresh mozzarella cheese - 4 oz. ball
Panko bread crumbs - 1/2 cup
Minced garlic - 2 large cloves
Butter or margarine - 3 tbs
Chopped  mushrooms - 1/4 cup
Extra virgin olive oil - 2 tbs
Cheap white wine - 1/4 cup

A few words on ingredients:

Ingredient amounts are approximate.  You can't really over-stuff this chicken.  If you do, the worst that will happen is that yummy goodness will melt out of the chicken and make for a more delicious sauce. 

Chicken: You can use full boneless, skinless chicken breasts, but you'll need to pound them out to be very thin, or you'll need to drastically increase cooking time (don't just increase oven temp, unless you like dry chicken). 

Mozzarella cheese: You can use processed mozzarella instead of the fresh ball, but it will not be as luscious.

Mushrooms:  Most any type of mushroom will be delicious.  Button mushrooms happened to be in my fridge!

Panko bread crumbs:  Any type of bread crumb will do, but panko has a fabulous crispy quality that you just do not find in run of the mill, Italian-style bread crumbs.

Cheap white wine:  For the love of all that is holy, don't ever use expensive wine in your cooking!  Good wine is for drinking, my friends.  Any cheap wine will taste great in this dish.  P.S. If you're not into alcohol, you can always use chicken stock.

Enough about ingredients, here's how to make it. 


1. Preheat oven to 325.
2. Pound out chicken to about half its thickness (this part can be really fun after a long day)

3. Combine panko bread crumbs and parmesan cheese into a bowl.  Coat chicken strips in mixture.
4. In the center of chicken strip, add 1/2 tsp butter, a pinch of garlic, a tbs chopped mushrooms, and a slice   of mozzarella. 
5. Fold each chicken strip in at the sides and spear through with toothpick. 
6. Repeat until all chicken is wrapped.
7. In a baking pan, add olive oil, wine, and  any remaining mushrooms and garlic.  Line up chicken rolls so they are evenly spaced.
8. Bake 30 minutes or until chicken is cooked throughout.
9. Let cool for a few minutes.  Remove toothpicks and serve with pan juices. 


Great sides include steamed corn and fresh bread for sauce dipping.

I welcome all comments, suggestions, fans, and critics with an open apron.

Cheers,

Emily