Sunday, March 6, 2011

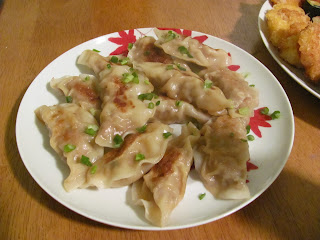
Wasabi-Pork Dumplings!

March 4th was Rich's birthday and I asked him what he wanted for his "birthday dinner."  Turns out, he enjoyed sushi making so much (you may remember Valentine's Day) that he wanted to do it again.  So sushi it was.  We enjoyed spicy tuna, salmon/cream cheese Philadelphia rolls, and spicy avocado shrimp tempura rolls this time.  Also on the menu was something new and exciting, pork dumpings!  This was my first foray into homemade dumplings, and I must say, they were pretty simple to make and very delicious.


Here's what you need (makes about 12 dumplings)

Dumpling wrappers (usually found in the frozen section)
1/4 lb ground pork
2 stalks green onion, chopped
1 tbs corn starch
1 tbs soy sauce
1 tsp wasabi paste
1/4 cup chopped yellow onion
1 garlic clove, minced (or sub 1 tsp powdered garlic)
1 tsp fresh ginger, minced (or sub 1 tsp powdered ginger)
1 tbs peanut oil
1/3 cup water

1. Combine pork, green onion, yellow onion, corn starch, soy sauce, wasabi, garlic, and ginger in a large bowl
2. Place 1 tbs of the mixture in the center of dumpling wrapper
3. Slightly wet the outer rim of the wrapper with water
4. Fold dumpling in half (if dough breaks, you may be using too much filling)
5. Press edges firmly together to seal dumpling
6. Repeat until all pork mixture is used (should make about 12)
7. Add oil to a pan at medium heat
8. Add dumplings to pan, cook until slightly browned on each side (about 1 min each side)
9. Add water to pan and cover.  Cook until all water is evaporated.
10. Garnish with chopped green onions.  Use soy sauce for dipping!


Note: you can use a variety of fillings for these dumplings.  Try shrimp or chicken for something different.  Simple to make, and a great appetizer or side dish with sushi. 


It was Rich's birthday, but you would think it was Charlie's based on the evidence...
It's party time!
 

Thursday, February 24, 2011

Fish Tacos!

In this recipe, I've combined two of my great loves: seafood and tacos. 
You know you want a bite! 


This past Saturday, Rich and I had the ingenious idea to make tuna tacos for dinner.  Since we were out doing some shopping for the afternoon, we decided to drop in to our local Whole Foods.  Surely, they would have some fresh, yummy tuna.  We rolled in and the line for the fish market was pretty steep.  I spied just one lonely (and tiny) tuna medallion sitting under the glass.  As I waited in line, I crossed my fingers and hoped they would have more tuna in the back.  After all, what are tuna tacos without the tuna?

It was finally my turn.  I stood face to face with the fish monger standing behind the counter holding my dinner fate in his plastic-gloved hands.  I asked the dreaded question, "Is that all the tuna you have?"  Sigh.  Alas, it was the last soldier standing.  I decided to take it, but knew it wouldn't be enough for the both of us.  I glanced across the fish display and decided upon some tilapia.  Ahhh, tilapia...the old stand-by.  Inexpensive, moist, mild flavor...it would have to work. 

And, by george, did it work!  Rich (tuna taco connoisseur) admitted he thought the tilapia tacos were just as delicious as the tuna!  Yee-ha!

Here's the recipe:

4 soft corn tortillas
4 flour tortillas  (you can use hard, soft, corn, or flour - variety is the spice of life!)
1 16oz can black beans
2 cups shredded cabbage
Fresh fish (about 1 lb - use tuna, tilapia, swordfish, or any grill-able fish)
3 tbs lemon juice
1 tbs olive oil
1 tsp dijon mustard
1 carrot (peeled into shavings)
1 tsp honey
1 tsp chili power
1 tsp paprika
salt, pepper, hot sauce (I love sriracha)  to taste
1 avocado, diced
1 ball fresh mozzarella, sliced


1. Whisk together lemon juice, olive oil, mustard, and honey in bowl
2. Toss half the dressing in a separate bowl with cabbage and carrot for a crispy slaw.
3. Add remaining dressing to fish.  Rub chili power, paprika, salt, and pepper on the fish (no more than 10 minutes marination required).
4. Wrap tortillas in foil.
5. Warm black beans in small pot (add hot sauce, chili power, adobo, paprika, cayenne - to taste)
6. Grill fish until it easily flakes.  For tilapia, about 3 minutes on each side does the trick (caution: it will fall apart and slip through the grates if you are not careful).  For tuna, you'll want a nice medium rare pink color in the middle - it may take a little bit longer than the tilapia.  Warm foil-wrapped tortillas in grill while fish cooks.
7. Shred fish between two forks to get a nice consistency for taco filling.
8. Fills tacos generously with fish, beans, avocado, slaw and mozzarella.  Drizzle with hot sauce for a kick!
Arriba Arriba! Eat while it's hot!
Tacos are just fabulous.  They are colorful, customizable, edible little contraptions!  Make some for yourself!

Cheers,
Emily

Saturday, February 12, 2011

Homemade Sushi for your Valentine!

This year, make sushi together for V-day! 


In my opinion, it is much easier to come up with a Valentine's day gift for a girl.  When it comes to traditional gifts: flowers, chocolate, jewelry, perfume - ALL are way more girl appropriate.  So I was faced with yet another V-day conundrum this year when brainstorming what to do for Rich.  Here's what happened:


Friday February 11

7:30am:  Rich and I talk about getting some take-out for dinner.  I suggest sushi (one of our favorites), and his eyes light up. 
10:30am: Sitting at work, I brainstorm what I could possibly get Rich for Valentine's day.  Then I remember our earlier conversation and it came to me: sushi.  But not just any sushi, let's make it at home!
1:15pm: Since I have never delved into the art of sushi-making before, I realize I am going to need to stock up on some essentials before I can even get cooking.  I look to my co-workers for inspiration and get some great ideas for ingredients and local shops to pick up the goodies.
4:30pm: Off from work and t-minus 2.5 hours until Rich gets home.  I have some shoppin' to do!
4:45pm: My first stop - the local fish monger.  Assured by co-workers that this is the place for sushi grade fish, I am inspired by the beautiful tuna I find.  I also pick up some great sushi rice and noori. 
5:10pm: I arrive at World Market, one of my favorite stores.  They have a great selection of Japanese groceries and I pick up hot chili oil, sriracha, a rolling mat, ginger, wasabi, and this adorable sushi dinner set.
5:40pm:  I arrive at the dreaded Barracks Road Shopping Center to pick up the rest of the groceries that I will need for dinner.  Normally, I try to avoid this bustling zoo of UVA students and retail-crazed C-villians, but I was on a time crunch and Kroger was the closest grocery store in the vicinity. I pick up some sesame seeds, lump crab meat, veggies, shrimp, an orchid, and a bottle of champagne because I'm classy.
6pm:  I arrive home to a hyper pup that needs a walk and his dinner.  He had no concept of the kind of time crunch I was working with.  I take him for a power walk around the block and fill his bowl with kibble.
6:15pm:  Forty five minutes left!  Ahhh!  I quickly cook the rice, chop the veggies, slice the fish, fry some shrimp (tempura style), set the table, and light some candles.  My dreams of completing the dinner before 7pm are no longer realistic and I decide that Rich and I will roll the sushi together.
7pm:  Rich gets home and is surprised by his Valentine's Day gift!

Who wouldn't want to come home to this?
  Types of rolls we made:

1. Spicy tuna - diced tuna, sriracha, hot chili oil, scallion
2. Spicy shrimp - Shrimp tempura, sriracha, cucumber, red pepper
3. Crab roll - lump crab, tempura crunch, cucumber, avocado
4. Tuna Avocado - tuna, avocado, cucumber

 Sushi-making was both fun and challenging.  Rolling was certainly the hardest part and gave me a great respect for sushi-chefs.  Next time I go out for sushi, I am eating at the bar and observing the chef's skills!  Making your own sushi also allows for creativity.  Get enough ingredients and make your own delightful combinations!  Try it yourself for your valentine, or invite friends over for a sushi-rolling dinner party! 

Cheers,
Emily

Monday, January 31, 2011

Tantilizing Tilapia in White Wine and Veggies

I'll admit it.  I was going to take a break from blogging tonight.  I was going to make a simple, boring, "I'm just recovering from a bad case of the Mondays" dinner.  I contemplated making a simple pizza...after all, there was dough, leftover tomato sauce, and a fresh mozzarella ball sitting on the top shelf of the fridge.

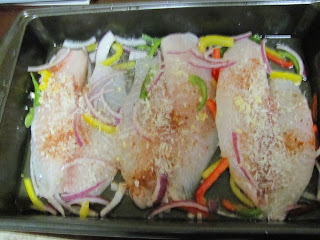
Suddenly my eyes caught a package of tilapia fillets, purchased during my regular weekend grocery store stock-up.  I just couldn't justify letting the fish sit there another night.  In my opinion, after a day or two of sitting in the fridge, fish tend to get a little....fishy (I know, bad pun).  As soon as I prepped the fish for the oven, I knew this was a recipe that deserved to be shared.  It looked so vibrant and colorful, just the thing to cure a case of seasonal affective disorder!


Seriously, it looks like spring time...in a pan!
This recipe is simple to make, healthy, and most importantly, delicious!


Ingredients:
1 1/2 lb Tilapia Fillets (about 3 large fillets)
1/4 cup red onion, thinly sliced
1/2 cup mixed bell pepper, thinly sliced into strips (any mixture of red, yellow, green or orange)
2 tbs olive oil
1/4 cup white wine
1/4 cup bread crumbs
1 lemon, juiced
1 garlic clove, minced
Chili power, salt and pepper, to taste

Instructions:

1. Preheat oven to 325
2. Add olive oil to an empty baking pan
3. Line the pan with the assortment of veggies (peppers and onions)
4. Place tilapia filets in the pan
5. Pour wine over fish and veggies and lemon juice
6. Add salt, pepper, garlic, and chili power as desired (I like to use chipotle chili powder for a little kick)
7. Sprinkle bread crumbs over the top of the fillets
8. Bake for about 25 minutes, or until fillets easily flake with a fork
9. Serve hot with veggies and sauce spooned over fish


As you can see, I served my tilapia with steamed green beans and cous-cous

Give this one a try and let me know what you think!

Cheers,

Emily

Sunday, January 30, 2011

Stuffed Mushrooms!

Appetizers are amazing!  Dress them up, you have cocktail party fare.  Dress them down, you have Superbowl food (truth be told, appetizers may quite possibly qualify as the only thing I enjoy about football).  Make a variety of different appetizers, you can call it a Tapas dinner.

An appetizer's only purpose in life is to be scrumptious.  After all, appetizers are always eaten in small portions, so people are less likely to worry about Weight Watchers points, and more likely to dig in to that fabulous bacon-wrapped date everyone's been talking about.  A great appetizer wakes up your palette and leaves you wanting more.
Another bonus: appetizers smell really yummy.

This past Saturday evening, 4pm struck, and so did a voracious hunger.  But alas, it was too early to make dinner, and too late to think about a late lunch.  After all, I had a delightful dinner planned and the last thing I wanted to do was ruin my appetite.  I opened the fridge and a few key ingredients met my eyes: mushrooms, goat cheese, turkey bacon...EUREKA!  I decided to make stuffed mushrooms!

The great thing about stuffed mushrooms is that you can basically stuff anything into those suckers.  They also end up looking impressive and tasting even better.  Here are the ingredients I used (and some great substitutions you can use too)!:

8-10 Mushrooms (I used "baby bellas," but any large sized, button shaped 'shroom will do)
3 oz goat cheese, crumbled (most cheeses could work here)
1 mozzarella string cheese, grated (told you I literally used up what was in my fridge)
2 strips turkey bacon, chopped (real bacon, ham, or prosciutto would all be scrumptious)   
1/4 cup bread crumbs (Italian or Panko is fine)
Uncapped mushroom with plenty of stuffing room!
2 tbs butter or margarine
2 tbs chopped green onions
1 clove minced garlic
1/4 cup chopped red onion

Instructions:

1. Preheat oven to 425
2. Remove mushroom caps.  Set uncapped mushrooms
aside on a baking sheet and chop stems.
These guys are practically begging for filling!
3. Saute bacon on medium heat until crispy.

4. Add red onions, garlic, mushroom stems, and butter (note: if you use real bacon, you won't need the butter).  Saute on medium-low until tender.
5. Add cheeses, green onions, and bread crumbs and cook on low heat for about 2 minutes or until filling is crispy and cheese has begun to melt.
6. Stuff filling into mushrooms - try to get as much filling in as will fit.  The more, the better!
7. Bake mushrooms for about 10 minutes or until heated through.
8.  Serve and enjoy!

You will look this happy if you try this recipe!
As you may have guessed, I'm a fan of apps (and no, I don't mean for my i-phone).  So I can promise you more appetizer recipes in the near future.  I may even inspire you to host a Superbowl party!

Cheers,
Emily

Thursday, January 27, 2011

CHOPPED!

Being the cooking nerd that I am, I asked for something rather non-traditional for Christmas.  I asked my husband to stage a culinary challenge for me.  I got the idea from the Food Network television show, Chopped.  The premise of the show is that four chefs compete in three rounds of cooking (appetizer, entree, and dessert).  The chefs are given a basket of ingredients for each round that they must use in the dish.  Each round, one chef gets "chopped" (hence the title of the show).  By the end, there is one chef standing, and he or she becomes a Chopped Champion.

This past Tuesday evening, I arrived home from work to a basket of secret ingredients, a well-stocked pantry, and a grinning husband.  It was on.  I was given 30 minutes on the clock to create a delicious entree. 

My secret ingredients (which Rich took from an actual Chopped episode):
1. Chicken things (bone-in with skin)
2. Ginger root
3. Green Onions
4. Honey

My initial reaction was one of relief - this was a flavor profile I could work with!  Immediately, I thought Asian!  Using every one of these ingredients would not be difficult. 

Then, I took a look at the chicken and panicked.  These were some monster thighs and 30 minutes was not a lot of time.  I had to ensure they were cooked through, or else I would be chopped for sure (no one ever makes it to the next round serving raw poultry).  So, here is what I did:

1. I immediately preheated the oven to 375, as I knew I wanted to bake the chicken.  However, I decided to brown the chicken in a pan to get the cooking process started while the oven pre-heated.
2. Once browned, the chicken found its way to a baking pan and into the oven.
3. Meanwhile, using the same pan (now coated with a bit of chicken fat), I sauteed grated ginger and garlic. 
4. After the ginger and garlic softened, I added a bit of white white, orange juice, honey, chili powder, green onions, and just the tiniest bit of peanut butter.  As we all know too well, peanut butter can have a very overpowering effect: use sparingly!  I let this mixture reduce on a low heat.
5. Then I thought, well, I can't just serve chicken and sauce.
6.  Keeping with the Asian-inspired theme, I sauteed a bit more garlic and ginger in olive oil in a separate pan.  Then I tossed in some baby spinach and thinly sliced fennel.  I added salt and pepper to taste. 

7. Well, here I was with about 5 minutes on the clock and things were looking good.  The chicken was just about done, but the skin was not crispy. 
8.  I brushed a bit of the wine reduction sauce over the chicken skin and threw the pan of chicken into the broiler.  After a minute or two of broiling, I removed the chicken from the oven to rest.
9. 3 minutes to go...
10. I got to thinking about my dish and realized this could end up pretty one-note texturally.  I've seen many an episode where the food was delicious, but the contestant was chopped because the dish could have used a crunch.  Thinking quickly, I spotted some pistachios in the cupboard, crushed them, and topped off the veggies with some pulverized pistachio!
11. One minute left and time to plate!  The veggies were transferred to the plate as was the chicken.  I even smeared the sauce all fancy-like around the plate.  Oh yeah, you know what I'm talking about.
Time is up!  Step away from your dishes!

Although I was not actually competing with anyone (just going for personal best), Rich assured me that this dish would NOT be chopped!

Try this dish yourself, or better yet, stage your own version of Chopped!  It was a lot of fun.  Next time, I'm going to try to do an appetizer round followed by an entree round (that is, if someone is kind enough to go out and purchase some more secret ingredients for me)! 

Happy cooking,
Emily

Sunday, January 23, 2011

Homemade Spaghetti Sauce and Turkey Meatballs (in an hour or less)!

It's a Wednesday night at 6:30pm.  You just got back from the gym and you are famished.  You're thinking, "I could really go for some spaghetti and meatballs, but that will take all night!"  Think again!
 
Pasta sauce is one of my favorite things to cook!  There are so many variations and (believe it or not), a good sauce doesn't have to take all day.  I have always been a meatball fan.  Substituting ground turkey for beef cuts out some of the fat and cholesterol.  I know what you're thinking: "Won't my meatballs end up dry if I use a lean meat like ground turkey?"  The answer is a resounding NO!  In fact, I can guarantee that if you follow my recipe, your turkey meatballs will be moist, tender, and delicious.  Another bonus: leftover meatballs make for some fantastic meatball subs (just ask my husband, he's a fan). 


First things first, you'll want to get the sauce going early so it has some time to thicken and develop a rich flavor. 

Pasta Sauce Ingredients:

2 - 28oz cans crushed tomatoes (you can also use whole and puree them)
2 garlic cloves, minced
1 small yellow onion, grated
2 carrots, grated
1/2 green bell pepper, minced
2 tbs olive oil
2 tbs butter or margarine
1/4 cup inexpensive red wine
2 tbs dried basil*
1 tbs dried marjoram*
1 tbs dried italian parsley*
Salt and pepper to taste

*Fresh herbs are absolutely fabulous (I simply cannot wait until it is warm enough to grow herbs again).  If you are lucky enough to have them handy, give them a fine chop and be sure to add them to your sauce just before serving.  You can reduce the dried herbs you added earlier by about half.


1. Heat butter and olive oil in a large sauce pan at medium heat.
2. Add onions, garlic, carrots, and green pepper.  Saute at medium until tender.
3. Add crushed tomatoes, wine, herbs, salt, and pepper.  Give the sauce a stir.  Reduce heat to medium-low and cover. 

While sauce is simmering and thickening, it is time to get started on your meatballs. 

Meatball ingredients:
1.25 lb ground turkey (7% fat or less is preferable)
1/2 cup Italian breadcrumbs
1/4 cup grated parmesan cheese
1 egg
Splash of milk
1 tsp olive oil
1 tsp dried basil
1 tsp dried parsley


1. Preheat oven to 350.
2. Add all ingredients together in a large mixing bowl.
3. Get in there with your hands and work the meatball mixture until all ingredients are thoroughly combined.
4. Meat should now be easy to mold into balls (add more breadcrumbs if mixture is too wet).
5. Mold meat into small-medium sized balls (a bit larger than a golf ball). 
6. Line meatballs on a large baking sheet.  This recipe should make about 12-16 balls.
7. Bake meatballs for 10 minutes (or until browned on all sides)

THEN...

Mmm.  Smells like an Italian lives here!

Add meatballs to your sauce!   Traditionally, meatballs are not baked at all, but simmered in tomato sauce for a long period of time for a slow cook that retains moisture.  I find that when I don't have the time for this, simply browning the meatballs in the oven and then adding them to the sauce works great!

Allow sauce and meatballs to simmer for an additional 30 minutes.  Take this time to boil some water and cook your spaghetti.  Fresh grated mozzarella and/or parmesan cheeses make lovely garnishes to a fabulous bowl of spaghetti and meatballs!


Happy Cooking,
Emily