Wednesday, July 13, 2011

Pan Seared Crab Cakes and Eggplant Margherita

As you may have noticed, I've been a bit lazy about blogging over the last few months.  Performing in a play, taking on extra projects at work, and traveling through Costa Rica can do that to a person.  But enough excuses...I am back.  And to lure you back to reading my blog, I bring to you some of my greatest recipes of all time!

First, I present my pan seared crab cakes!  And who on God's green earth does not love crab cakes (those with shellfish allergies excluded)? 


Here's what you need for the crab cakes:
  • 1 lb lump crab meat
  • 3/4 cup panko bread crumbs (you can also hand-crumble stale bread)
  • 1 tsp old bay
  •  1/4 cup mayonaise
  • 1 egg
  • 1 tbs lemon juice
  • 1 tsp dijon mustard
  • 1/4 cup fresh italian parlsey, chopped 
  • salt and pepper
  • butter (for the pan)
 1. In a small bowl, whisk together wet ingredients (mayo, egg, lemon juice, mustard)
2. In another bowl, combine bread crumbs, old bay, parsley, salt and pepper
3. In a large bowl, add the crab meat.  Be sure all the shell pieces are picked out.
4. Add the wet and dry ingredients to the crab meat.  Use your hands to carefully combine until the consistency is moist, but firm enough to form patties.  Be careful to leave those delicious crab lumps intact!
5. Form into small to medium sized patties.  The recipe makes about 5-7 medium cakes.
6. Chill the cakes in the fridge for about 15-20 minutes.  This helps firm them up and keeps them from falling apart in the pan (this is a great time to get to work on the eggplant recipe below)!

These cakes are chillin'!

7. Melt a tablespoon of butter in the pan and saute the cakes on low-medium heat for about 4 minutes on each side.  The ideal crab cake is warm throughout and golden brown on both sides. 


Next, is my eggplant margherita!  This colorful dish makes a lovely compliment to any meal.  It is simple to make, healthy, and really beautiful to look at! 


Ingredients for Eggplant Margherita:
  • 1 medium eggplant, sliced in 1/4 inch thick rounds
  • 2-3 medium sized tomatoes, sliced thin (any variety will do, but I am proud to say I used fresh  vine tomatoes from my cooperative farm share)
  •  A bunch of fresh basil (you can also use dried if you are out of the fresh stuff)
  • 1/4 cup grated parmesan cheese
  • 1/4 cup mozzarella cheese, shredded or cut into thin strips
  • olive oil
  • black pepper
1. Preheat oven to 400 degrees
2. Grease a baking sheet with olive oil
3. Add eggplant rounds to the baking sheet
4. On each round, layer a tomato slice, basil leaf, and several mozzarella slices
5. Sprinkle the eggplant rounds with parmesan cheese, black pepper, and just a drop of olive oil
6. Bake for 10 minutes, or until eggplant is soft and cheese is slightly melted

Behold!  The final result!


I served my crab cake dinner with margherita eggplant and smashed potatoes!  Try this one for yourself next time you have a special occasion (or next time crab meat is on sale)!  Add some basil garnish for some extra panache and enjoy!   

Friday, April 15, 2011

Maple Glazed Turkey Burgers and Turnip Fries

Spring is in the air and there are oh so many lovely things to do outside...including my all-time favorite way to cook...GRILLING!  In this recipe, you will find an absolutely smashing alternative to your basic burger and fries.  The fries are baked and the burgers are full of veggies, so it will not result in a fat booty either.  Not that there's anything wrong with that.  To quote Freddie Mercury, "fat bottomed girls, you make the rockin' world go round!"

Here's what you need for the burgers:

  • 1 lb ground turkey (in the store, they usually have a variety of "fat contents."  You're grilling, so much of the fat will drip out, but I tend to use 7% fat.  Ground turkey breast is less fatty, but more expensive)
  •  1/2 cup corn, frozen or fresh will do
  • 1/2 cup red bell pepper, chopped
  • 1/4 cup red onion, minced
  • 2 cloves garlic, minced
  • 1/4 cup fresh parsley, chopped
  • 1 tbs olive oil
  • salt and pepper
  • 1/2 cup maple syrup
  • Buns
1. Combine all ingredients above except the maple syrup.  And the buns, duh.
2. Form burgers into patties (this will make 5-6 decent sized burgers)
3. Brush one side of patties with maple syrup.  Grill burgers syrup-side down.
4. When burgers are well charred and ready to be flipped, brush burgers and flip again.
5. Serve on toasted buns with fresh spinach, tomato, and horseradish-style mustard.

Here's what you need for the turnip fries:
  •  4-6 medium sized turnips, the amount you make will depend on how many people you are feeding.  You can assume an average eater with eat about 1.5-2 turnips worth of fries.
  • 1/4 cup peanut oil, most oils will work here, but peanut oil is notoriously good for fries
  • 1/2 cup parmesan cheese, grated
  • 1/2 cup bread crumbs
1. Preheat oven to 425.
2.Peel the turnips and cut into french-fry sized strips
3. In a large bowl, toss strips oil
5. Add strips to a large zip-lock type bag
6. Add bread crumbs and parmesan to the bag.  Seal the bag and shake (remember the shake 'n bake commercials?)
7. Add coated strips to a large baking sheet and bake for 20-25 minutes, or until lightly brown.
8. Turn broiler to high heat and broil for an additional 2-3 minutes for additional crispness.

Wah-la!  You have burgers and fries that you can feel good about!  And (good news) it tastes pretty awesome too!

Sunday, March 6, 2011

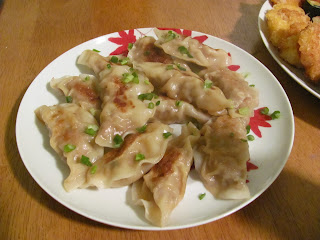
Wasabi-Pork Dumplings!

March 4th was Rich's birthday and I asked him what he wanted for his "birthday dinner."  Turns out, he enjoyed sushi making so much (you may remember Valentine's Day) that he wanted to do it again.  So sushi it was.  We enjoyed spicy tuna, salmon/cream cheese Philadelphia rolls, and spicy avocado shrimp tempura rolls this time.  Also on the menu was something new and exciting, pork dumpings!  This was my first foray into homemade dumplings, and I must say, they were pretty simple to make and very delicious.


Here's what you need (makes about 12 dumplings)

Dumpling wrappers (usually found in the frozen section)
1/4 lb ground pork
2 stalks green onion, chopped
1 tbs corn starch
1 tbs soy sauce
1 tsp wasabi paste
1/4 cup chopped yellow onion
1 garlic clove, minced (or sub 1 tsp powdered garlic)
1 tsp fresh ginger, minced (or sub 1 tsp powdered ginger)
1 tbs peanut oil
1/3 cup water

1. Combine pork, green onion, yellow onion, corn starch, soy sauce, wasabi, garlic, and ginger in a large bowl
2. Place 1 tbs of the mixture in the center of dumpling wrapper
3. Slightly wet the outer rim of the wrapper with water
4. Fold dumpling in half (if dough breaks, you may be using too much filling)
5. Press edges firmly together to seal dumpling
6. Repeat until all pork mixture is used (should make about 12)
7. Add oil to a pan at medium heat
8. Add dumplings to pan, cook until slightly browned on each side (about 1 min each side)
9. Add water to pan and cover.  Cook until all water is evaporated.
10. Garnish with chopped green onions.  Use soy sauce for dipping!


Note: you can use a variety of fillings for these dumplings.  Try shrimp or chicken for something different.  Simple to make, and a great appetizer or side dish with sushi. 


It was Rich's birthday, but you would think it was Charlie's based on the evidence...
It's party time!
 

Thursday, February 24, 2011

Fish Tacos!

In this recipe, I've combined two of my great loves: seafood and tacos. 
You know you want a bite! 


This past Saturday, Rich and I had the ingenious idea to make tuna tacos for dinner.  Since we were out doing some shopping for the afternoon, we decided to drop in to our local Whole Foods.  Surely, they would have some fresh, yummy tuna.  We rolled in and the line for the fish market was pretty steep.  I spied just one lonely (and tiny) tuna medallion sitting under the glass.  As I waited in line, I crossed my fingers and hoped they would have more tuna in the back.  After all, what are tuna tacos without the tuna?

It was finally my turn.  I stood face to face with the fish monger standing behind the counter holding my dinner fate in his plastic-gloved hands.  I asked the dreaded question, "Is that all the tuna you have?"  Sigh.  Alas, it was the last soldier standing.  I decided to take it, but knew it wouldn't be enough for the both of us.  I glanced across the fish display and decided upon some tilapia.  Ahhh, tilapia...the old stand-by.  Inexpensive, moist, mild flavor...it would have to work. 

And, by george, did it work!  Rich (tuna taco connoisseur) admitted he thought the tilapia tacos were just as delicious as the tuna!  Yee-ha!

Here's the recipe:

4 soft corn tortillas
4 flour tortillas  (you can use hard, soft, corn, or flour - variety is the spice of life!)
1 16oz can black beans
2 cups shredded cabbage
Fresh fish (about 1 lb - use tuna, tilapia, swordfish, or any grill-able fish)
3 tbs lemon juice
1 tbs olive oil
1 tsp dijon mustard
1 carrot (peeled into shavings)
1 tsp honey
1 tsp chili power
1 tsp paprika
salt, pepper, hot sauce (I love sriracha)  to taste
1 avocado, diced
1 ball fresh mozzarella, sliced


1. Whisk together lemon juice, olive oil, mustard, and honey in bowl
2. Toss half the dressing in a separate bowl with cabbage and carrot for a crispy slaw.
3. Add remaining dressing to fish.  Rub chili power, paprika, salt, and pepper on the fish (no more than 10 minutes marination required).
4. Wrap tortillas in foil.
5. Warm black beans in small pot (add hot sauce, chili power, adobo, paprika, cayenne - to taste)
6. Grill fish until it easily flakes.  For tilapia, about 3 minutes on each side does the trick (caution: it will fall apart and slip through the grates if you are not careful).  For tuna, you'll want a nice medium rare pink color in the middle - it may take a little bit longer than the tilapia.  Warm foil-wrapped tortillas in grill while fish cooks.
7. Shred fish between two forks to get a nice consistency for taco filling.
8. Fills tacos generously with fish, beans, avocado, slaw and mozzarella.  Drizzle with hot sauce for a kick!
Arriba Arriba! Eat while it's hot!
Tacos are just fabulous.  They are colorful, customizable, edible little contraptions!  Make some for yourself!

Cheers,
Emily

Saturday, February 12, 2011

Homemade Sushi for your Valentine!

This year, make sushi together for V-day! 


In my opinion, it is much easier to come up with a Valentine's day gift for a girl.  When it comes to traditional gifts: flowers, chocolate, jewelry, perfume - ALL are way more girl appropriate.  So I was faced with yet another V-day conundrum this year when brainstorming what to do for Rich.  Here's what happened:


Friday February 11

7:30am:  Rich and I talk about getting some take-out for dinner.  I suggest sushi (one of our favorites), and his eyes light up. 
10:30am: Sitting at work, I brainstorm what I could possibly get Rich for Valentine's day.  Then I remember our earlier conversation and it came to me: sushi.  But not just any sushi, let's make it at home!
1:15pm: Since I have never delved into the art of sushi-making before, I realize I am going to need to stock up on some essentials before I can even get cooking.  I look to my co-workers for inspiration and get some great ideas for ingredients and local shops to pick up the goodies.
4:30pm: Off from work and t-minus 2.5 hours until Rich gets home.  I have some shoppin' to do!
4:45pm: My first stop - the local fish monger.  Assured by co-workers that this is the place for sushi grade fish, I am inspired by the beautiful tuna I find.  I also pick up some great sushi rice and noori. 
5:10pm: I arrive at World Market, one of my favorite stores.  They have a great selection of Japanese groceries and I pick up hot chili oil, sriracha, a rolling mat, ginger, wasabi, and this adorable sushi dinner set.
5:40pm:  I arrive at the dreaded Barracks Road Shopping Center to pick up the rest of the groceries that I will need for dinner.  Normally, I try to avoid this bustling zoo of UVA students and retail-crazed C-villians, but I was on a time crunch and Kroger was the closest grocery store in the vicinity. I pick up some sesame seeds, lump crab meat, veggies, shrimp, an orchid, and a bottle of champagne because I'm classy.
6pm:  I arrive home to a hyper pup that needs a walk and his dinner.  He had no concept of the kind of time crunch I was working with.  I take him for a power walk around the block and fill his bowl with kibble.
6:15pm:  Forty five minutes left!  Ahhh!  I quickly cook the rice, chop the veggies, slice the fish, fry some shrimp (tempura style), set the table, and light some candles.  My dreams of completing the dinner before 7pm are no longer realistic and I decide that Rich and I will roll the sushi together.
7pm:  Rich gets home and is surprised by his Valentine's Day gift!

Who wouldn't want to come home to this?
  Types of rolls we made:

1. Spicy tuna - diced tuna, sriracha, hot chili oil, scallion
2. Spicy shrimp - Shrimp tempura, sriracha, cucumber, red pepper
3. Crab roll - lump crab, tempura crunch, cucumber, avocado
4. Tuna Avocado - tuna, avocado, cucumber

 Sushi-making was both fun and challenging.  Rolling was certainly the hardest part and gave me a great respect for sushi-chefs.  Next time I go out for sushi, I am eating at the bar and observing the chef's skills!  Making your own sushi also allows for creativity.  Get enough ingredients and make your own delightful combinations!  Try it yourself for your valentine, or invite friends over for a sushi-rolling dinner party! 

Cheers,
Emily

Monday, January 31, 2011

Tantilizing Tilapia in White Wine and Veggies

I'll admit it.  I was going to take a break from blogging tonight.  I was going to make a simple, boring, "I'm just recovering from a bad case of the Mondays" dinner.  I contemplated making a simple pizza...after all, there was dough, leftover tomato sauce, and a fresh mozzarella ball sitting on the top shelf of the fridge.

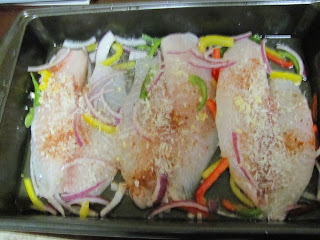
Suddenly my eyes caught a package of tilapia fillets, purchased during my regular weekend grocery store stock-up.  I just couldn't justify letting the fish sit there another night.  In my opinion, after a day or two of sitting in the fridge, fish tend to get a little....fishy (I know, bad pun).  As soon as I prepped the fish for the oven, I knew this was a recipe that deserved to be shared.  It looked so vibrant and colorful, just the thing to cure a case of seasonal affective disorder!


Seriously, it looks like spring time...in a pan!
This recipe is simple to make, healthy, and most importantly, delicious!


Ingredients:
1 1/2 lb Tilapia Fillets (about 3 large fillets)
1/4 cup red onion, thinly sliced
1/2 cup mixed bell pepper, thinly sliced into strips (any mixture of red, yellow, green or orange)
2 tbs olive oil
1/4 cup white wine
1/4 cup bread crumbs
1 lemon, juiced
1 garlic clove, minced
Chili power, salt and pepper, to taste

Instructions:

1. Preheat oven to 325
2. Add olive oil to an empty baking pan
3. Line the pan with the assortment of veggies (peppers and onions)
4. Place tilapia filets in the pan
5. Pour wine over fish and veggies and lemon juice
6. Add salt, pepper, garlic, and chili power as desired (I like to use chipotle chili powder for a little kick)
7. Sprinkle bread crumbs over the top of the fillets
8. Bake for about 25 minutes, or until fillets easily flake with a fork
9. Serve hot with veggies and sauce spooned over fish


As you can see, I served my tilapia with steamed green beans and cous-cous

Give this one a try and let me know what you think!

Cheers,

Emily

Sunday, January 30, 2011

Stuffed Mushrooms!

Appetizers are amazing!  Dress them up, you have cocktail party fare.  Dress them down, you have Superbowl food (truth be told, appetizers may quite possibly qualify as the only thing I enjoy about football).  Make a variety of different appetizers, you can call it a Tapas dinner.

An appetizer's only purpose in life is to be scrumptious.  After all, appetizers are always eaten in small portions, so people are less likely to worry about Weight Watchers points, and more likely to dig in to that fabulous bacon-wrapped date everyone's been talking about.  A great appetizer wakes up your palette and leaves you wanting more.
Another bonus: appetizers smell really yummy.

This past Saturday evening, 4pm struck, and so did a voracious hunger.  But alas, it was too early to make dinner, and too late to think about a late lunch.  After all, I had a delightful dinner planned and the last thing I wanted to do was ruin my appetite.  I opened the fridge and a few key ingredients met my eyes: mushrooms, goat cheese, turkey bacon...EUREKA!  I decided to make stuffed mushrooms!

The great thing about stuffed mushrooms is that you can basically stuff anything into those suckers.  They also end up looking impressive and tasting even better.  Here are the ingredients I used (and some great substitutions you can use too)!:

8-10 Mushrooms (I used "baby bellas," but any large sized, button shaped 'shroom will do)
3 oz goat cheese, crumbled (most cheeses could work here)
1 mozzarella string cheese, grated (told you I literally used up what was in my fridge)
2 strips turkey bacon, chopped (real bacon, ham, or prosciutto would all be scrumptious)   
1/4 cup bread crumbs (Italian or Panko is fine)
Uncapped mushroom with plenty of stuffing room!
2 tbs butter or margarine
2 tbs chopped green onions
1 clove minced garlic
1/4 cup chopped red onion

Instructions:

1. Preheat oven to 425
2. Remove mushroom caps.  Set uncapped mushrooms
aside on a baking sheet and chop stems.
These guys are practically begging for filling!
3. Saute bacon on medium heat until crispy.

4. Add red onions, garlic, mushroom stems, and butter (note: if you use real bacon, you won't need the butter).  Saute on medium-low until tender.
5. Add cheeses, green onions, and bread crumbs and cook on low heat for about 2 minutes or until filling is crispy and cheese has begun to melt.
6. Stuff filling into mushrooms - try to get as much filling in as will fit.  The more, the better!
7. Bake mushrooms for about 10 minutes or until heated through.
8.  Serve and enjoy!

You will look this happy if you try this recipe!
As you may have guessed, I'm a fan of apps (and no, I don't mean for my i-phone).  So I can promise you more appetizer recipes in the near future.  I may even inspire you to host a Superbowl party!

Cheers,
Emily